Monday, 8 September 2014

Can we make a pig ark from stock items?

Our elder daughter has moved to a house high on a valley-side above Cardiff.  As well as taking on a barn conversion, she, her husband and their son now have a stable block and 5 acres of sloping land.  Their first new venture is to keep pigs - 3 weaners which will go to the abattoir in about 6 months' time, but not before they have prepared plenty of ground for next year's fruit and vegetable growing.

The electric fencing was ordered and I offered to knock up a pig ark for them.  It was a disadvantage that we live 4 hours away as I wanted to make the ark at home.  I decided to go for a flat-pack pig ark and trust to my roof bars for transportation.  Somehow we ended up adding a kingsize mattress for the journey so with the plywood pieces, corrugated steel, oak skids and softwood roof struts we produced a sandwich-style roof-load.


I'm not sure that this load was within the manufacturer's recommendations.  I did take particular care on the drive.  Rarely have I negotiated bends and roundabouts with such care.  We arrived safely and after unloading I set about the final construction.  I had found some nice pieces of oak left over from our roof rebuild a few years ago, and they went onto the underside of the base to act as skids which will allow the ark to be moved around.


With two side struts added, the base was carried up to its first home in the lower field.


The end pieces each came out of half a sheet of 18mm ply, with a bolt-secured door.


The roof struts which, like the corrugated steel, were leftovers from our old postbarn, were friction fitted to the ends.


My charming assistant, who unwisely likened herself to Debbie McGee, held the bag of roofing screws. This was a big help as the three sheets of corrugated steel seemed to have minds of their own.


So there we were.  I had to buy the plywood and the bolts, but all the other bits came from stock.


Our grandson approved.  In fact he seemed interested in moving in.  If he does he won't have long.  The piglets arrive in about 10 days.


Sunday, 9 March 2014

Oak house signs

So here's what to do with those left over short ends of 4" oak floorboards: visit Matthias' brilliant website and buy his plans for a 3-D router pantograph for a few dollars, buy a nice little router, and spend much of the winter on and off fiddling around with offcuts of wood and steel rod to construct one of these fiendishly clever machines.  Spend more evenings in the workshop making the plywood stencils for all the letters you need for your signs (and even a couple of swallow images), then it's time for the quick bit.

Actually cutting the signs is really easy and quick.  Use some black acrylic paint to highlight the carved letters, sand and, if you wish, varnish away, then get out to the end of the track and, with your neighbouring farmer's permission, put up the signs to his farm and our house, Coed y Mynydd Isaf (Lower Mountain Wood), his horsefeed business, and our luxury holiday cottage, Gwenoldy (Swallows' Rest).

 
Job done. About a year from start to finish.


Wednesday, 26 February 2014

A mini ramp

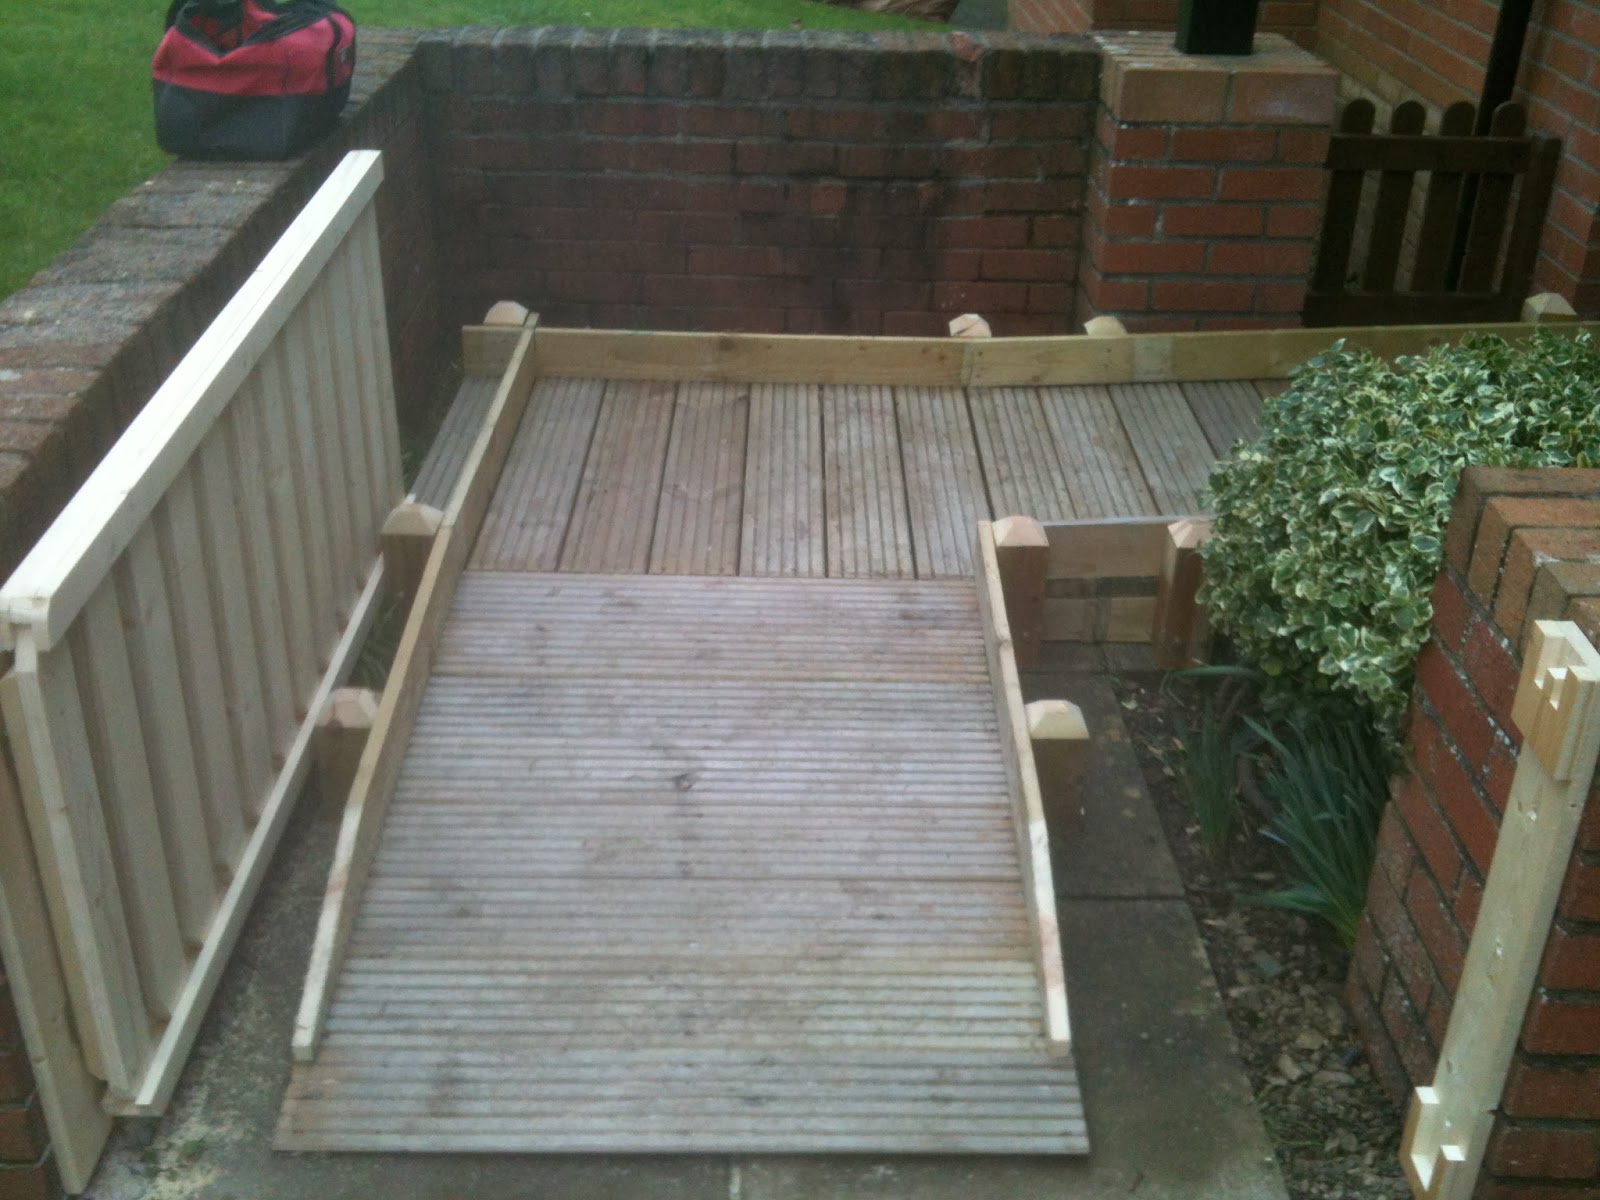
Father-in-law's substantial ramp having been dismantled and put into stock when he moved to his assisted-living apartment, it was time to use some of the materials to provide an easy way for my wheelchair-bound brother-in-law to get in and out of his house.

The scale of this project was relatively modest, and having made the key frameworks at home, I actually managed to get everything in the back of our estate car for the trip to south Wales.  The photos show the laying out of the frames, and the fixing of the decking and side rails.


The interesting challenge on this job was the gate.  The driveway up from the end of the ramp slopes quite steeply, so the original gate opened inwards.  The ramp now prevents this, as a normal gate would have to have such a gap at the bottom to clear the ramp that BIL's dog would be able to escape.  So I borrowed an idea from the excellent woodworking and engineering website at www.woodgears.ca, and created an articulating gate, similar to Matthias' design for a parallelogramming stairgate.  All the vertical elements of the gate pivot on the top and bottom horizontals, so you lift it at the non-hinged end and lower it behind the ramp to park it in the open position.


Thanks to some careful measuring on a previous visit (well done Elizabeth) and pre-fabrication, the installation of all this took just two and a half hours.  Ramp timbers, stainless steel bolts, screws and gate hinges came from stock.  As you can probably tell from the colour of the gate, I did have to buy a little bit of timber for that.  So, almost a stock item job.

Sunday, 29 December 2013

A bespoke bedside table, and Kindle stand 4

Father-in-law needed a bedside table with levels at just the right heights if he was to manage his touch lamp, his kindle stand and his reading glasses.  It would be a bonus if he could also both see and operate his TV remote control while lying on his back in bed.

On this occasion I did have to buy some timber, but not enough to make it an expensive project.  Here is the table (higher than you might expect because it has to be level with the bedside rail FIL uses to move himself about).  It was something of a rush job so the finish is just a wipe-on liquid wax.


The strange looking triangular piece in the front corner is where the remote control is now fixed by zip ties at a 45 degree angle to the horizontal (and pointing diagonally at the tv in the corner of the room.  It turns out that FIL can both see and operate the buttons (we had wondered whether semi-horizontal pressing would be possible for him, but it is).  The lamp sits on the lower section at the back.  The lower shelf carries books as ballast.

Meanwhile the design of the Kindle stand has progressed.  My first effort arose from FIL's finding it awkward (later impossible) to hold the Kindle on his chest while reading in bed: 


Then it became difficult for him to operate the small power button at the base of the Kindle - particularly necessary when you have dozed off in the night and wake to discover that the Kindle has automatically gone to sleep, too.  So version 2 incorporated a big spring-loaded button which presses on the tiny switch and which made it possible for a while for the Kindle to be switched back on:


However, these first 2 stands were relatively heavy, being made from offcuts of MDF, and FIL increasingly found it difficult to manipulate them.  Additionally, the operation of the big button became problematic.  I made a big breakthrough when I discovered a web forum which explained how to use the Kindle's programming language to disable the auto-switch-off routine.  No more finding it unusable after a brief doze. So Kindle 3 addressed the weight issue, being made of thin plywood with weight-saving cutouts wherever possible:

This worked well for a while, until FIL found it increasingly difficult to operate the small page-turning buttons at the side of the Kindle.  So now we have version 4 - lightweight again but this time providing large pivoting buttons to turn the pages back and forward.  This is the one I'm putting my name on!


Saturday, 14 December 2013

More woodwork for my father-in-law

I continue to try to come up with bits and pieces to mitigate my father-in-law's limited manual control.  In an earlier post I described his difficulty in switching on his Kindle, and the holder I made with a large button which connects via a pin to activate the switch.  Now the problem is that this holder is too heavy and difficult to grip.

Fortunately, a lot of internet searching turned up a way in which the Kindle can be programmed to prevent it from switching itself off.  Useful for cooks using it for recipes, apparently; certainly useful for FIL during the night when he wakes up and wants to read further without requiring anyone else to turn it back on.  It means that the Kindle needs charging every few days rather than every week, but that's not a problem.

So Kindle holder number 3 is a lightweight affair, made from thin plywood rather than mdf, and with cutouts wherever possible to keep the weight down:


This is now in use, but tends to move too much when the page-turning buttons are pressed.  So we are adding to the mix a lightweight plywood tray with some anti-slip material attached which FIL can position on his chest in bed under the Kindle holder.  Laborious but, we hope, effective.

If you have limited grip and digital control, managing toilet paper can be tricky.  Don't worry - not too much detail needed on this one.  Just a simple wooden shelf which holds the moist wipes boxes in place by friction, so that the lids can be pressed open and the tissues pulled out, without the whole caboosh ending up on the floor:

Last for now, a couple of further arm-crutch holders for different places in his flat.  We call them elephants' feet, and they are simply made out of 110mm drainage pipe, which is surely a stock item for most people?


The next project is a made-to-measure bedside table.  It has to be just the right height for FIL to reach from bed to manage a few items, including (we hope) the remote controls for his TV and Freeview box.  That's underway at present.

Sunday, 13 October 2013

Ride-on mower and ironing board

Years ago I bought an elderly Yardman ride-on mower as our development of the field made it ever more difficult to cut the grass with the 1964 Fordson Super Dexta tractor and 5-foot cut topper without taking out newly planted trees and flower beds.

The early years of ownership were marked by frequent trips to the repair shop, but over the last couple of years it has redeemed itself and given good service.  It's needed to have the odd bracket welded, but nothing too serious.  I have pretty much decided that it's no longer worth repair-shop bills and that I will try to discover how it works so that I can apply my limited mechanical skills to it.

I was pretty pleased a month or so ago when it lost drive and I discovered that the main belt from the engine at the front to the auto box over the back axle had popped off.  I was even more pleased when I managed to pop it back on again by temporarily removing one of the pulleys to get it back in line.  However, within a week the reason why it had popped off became clear as drive was lost again.  Metal fatigue in the side of the frame had led to one of the pulleys tearing its fixing.  You can just see daylight at the end of the arrow in this photograph - and there shouldn't be daylight visible there!


I thought that a piece of sheet steel, suitably drilled to match the bolt holes, would be enough to reinforce the side wall if placed on the outside of the frame.  As I don't do a great deal of metal work, sheet steel is not the sort of stock item I have around, but a little scavenging in the pile of stuff waiting to go to the tip turned up an old ironing board which soon gave up a piece to my angle grinder.


This doesn't make the most elegant repair, I know, but it works, and that's the main thing on a pretty ancient piece of machinery.  Perhaps I should treat the mower to some green paint to disguise the patch and self-tapping screws?


Saturday, 24 August 2013

Someone else's stock, and a mouse with two tails

As my father-in-law continues to struggle with his loss of manual dexterity, I keep trying to come up with solutions to some of the things he finds difficult.  He now has an electrically operated reclining/lifting chair, which is great, but he pointed out that the control panel (fitted with a generously proportioned clip designed to fasten to I don't know what) moved about on his side table every time he tried to adjust the chair.  I had a particular problem in trying to do something about this - no stock, as I had travelled light to visit and hadn't known about this in advance.

However, my brother-in-law, who lives nearby, generously gave me the run of his workshop and with a couple of pieces of wood, four 22mm pipe clips and a keyhole saw I fashioned a practical but non-too-elegant addition to FIL's tray stand which keeps the control panel rigid.


Another issue that we've been aware of for some time is the problem of managing a computer mouse when your fingers won't do as they're told.  By the time the mouse has been moved to get the cursor into position, the effort involved in pressing the mouse buttons often shifts the whole thing, and therefore the cursor, away from its target.  Very frustrating!

So I wondered whether it would be possible to separate the button functions from the movement function.  I shied away from wireless/optical mice, and dug an old wired one from the depths of a drawer.  Dismantling it revealed far more circuity than I was expecting, but I managed to drill the case and insert a second four-core cable, soldering the wires to the microswitches operated by the left and right buttons (FIL never got the hang of the wheel, so I gratefully left that alone).  Then I made a simple timber console to fit in front of the computer display, and wired two normally open switches in parallel to offer an alternative to the mouse buttons.  The mouse can be operated as intended, but the black switches offer less restricted access to clicking left and right.  It works for me, and it's going to Devon next week for FIL to try it.  One small confession - the switches weren't stock items.  I did think of buying a dozen but somehow restricted myself to just the two!