Sunday, 29 December 2013

A bespoke bedside table, and Kindle stand 4

Father-in-law needed a bedside table with levels at just the right heights if he was to manage his touch lamp, his kindle stand and his reading glasses.  It would be a bonus if he could also both see and operate his TV remote control while lying on his back in bed.

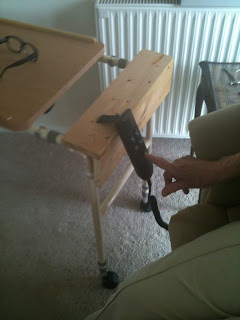
On this occasion I did have to buy some timber, but not enough to make it an expensive project.  Here is the table (higher than you might expect because it has to be level with the bedside rail FIL uses to move himself about).  It was something of a rush job so the finish is just a wipe-on liquid wax.


The strange looking triangular piece in the front corner is where the remote control is now fixed by zip ties at a 45 degree angle to the horizontal (and pointing diagonally at the tv in the corner of the room.  It turns out that FIL can both see and operate the buttons (we had wondered whether semi-horizontal pressing would be possible for him, but it is).  The lamp sits on the lower section at the back.  The lower shelf carries books as ballast.

Meanwhile the design of the Kindle stand has progressed.  My first effort arose from FIL's finding it awkward (later impossible) to hold the Kindle on his chest while reading in bed: 


Then it became difficult for him to operate the small power button at the base of the Kindle - particularly necessary when you have dozed off in the night and wake to discover that the Kindle has automatically gone to sleep, too.  So version 2 incorporated a big spring-loaded button which presses on the tiny switch and which made it possible for a while for the Kindle to be switched back on:


However, these first 2 stands were relatively heavy, being made from offcuts of MDF, and FIL increasingly found it difficult to manipulate them.  Additionally, the operation of the big button became problematic.  I made a big breakthrough when I discovered a web forum which explained how to use the Kindle's programming language to disable the auto-switch-off routine.  No more finding it unusable after a brief doze. So Kindle 3 addressed the weight issue, being made of thin plywood with weight-saving cutouts wherever possible:

This worked well for a while, until FIL found it increasingly difficult to operate the small page-turning buttons at the side of the Kindle.  So now we have version 4 - lightweight again but this time providing large pivoting buttons to turn the pages back and forward.  This is the one I'm putting my name on!


Saturday, 14 December 2013

More woodwork for my father-in-law

I continue to try to come up with bits and pieces to mitigate my father-in-law's limited manual control.  In an earlier post I described his difficulty in switching on his Kindle, and the holder I made with a large button which connects via a pin to activate the switch.  Now the problem is that this holder is too heavy and difficult to grip.

Fortunately, a lot of internet searching turned up a way in which the Kindle can be programmed to prevent it from switching itself off.  Useful for cooks using it for recipes, apparently; certainly useful for FIL during the night when he wakes up and wants to read further without requiring anyone else to turn it back on.  It means that the Kindle needs charging every few days rather than every week, but that's not a problem.

So Kindle holder number 3 is a lightweight affair, made from thin plywood rather than mdf, and with cutouts wherever possible to keep the weight down:


This is now in use, but tends to move too much when the page-turning buttons are pressed.  So we are adding to the mix a lightweight plywood tray with some anti-slip material attached which FIL can position on his chest in bed under the Kindle holder.  Laborious but, we hope, effective.

If you have limited grip and digital control, managing toilet paper can be tricky.  Don't worry - not too much detail needed on this one.  Just a simple wooden shelf which holds the moist wipes boxes in place by friction, so that the lids can be pressed open and the tissues pulled out, without the whole caboosh ending up on the floor:

Last for now, a couple of further arm-crutch holders for different places in his flat.  We call them elephants' feet, and they are simply made out of 110mm drainage pipe, which is surely a stock item for most people?


The next project is a made-to-measure bedside table.  It has to be just the right height for FIL to reach from bed to manage a few items, including (we hope) the remote controls for his TV and Freeview box.  That's underway at present.

Sunday, 13 October 2013

Ride-on mower and ironing board

Years ago I bought an elderly Yardman ride-on mower as our development of the field made it ever more difficult to cut the grass with the 1964 Fordson Super Dexta tractor and 5-foot cut topper without taking out newly planted trees and flower beds.

The early years of ownership were marked by frequent trips to the repair shop, but over the last couple of years it has redeemed itself and given good service.  It's needed to have the odd bracket welded, but nothing too serious.  I have pretty much decided that it's no longer worth repair-shop bills and that I will try to discover how it works so that I can apply my limited mechanical skills to it.

I was pretty pleased a month or so ago when it lost drive and I discovered that the main belt from the engine at the front to the auto box over the back axle had popped off.  I was even more pleased when I managed to pop it back on again by temporarily removing one of the pulleys to get it back in line.  However, within a week the reason why it had popped off became clear as drive was lost again.  Metal fatigue in the side of the frame had led to one of the pulleys tearing its fixing.  You can just see daylight at the end of the arrow in this photograph - and there shouldn't be daylight visible there!


I thought that a piece of sheet steel, suitably drilled to match the bolt holes, would be enough to reinforce the side wall if placed on the outside of the frame.  As I don't do a great deal of metal work, sheet steel is not the sort of stock item I have around, but a little scavenging in the pile of stuff waiting to go to the tip turned up an old ironing board which soon gave up a piece to my angle grinder.


This doesn't make the most elegant repair, I know, but it works, and that's the main thing on a pretty ancient piece of machinery.  Perhaps I should treat the mower to some green paint to disguise the patch and self-tapping screws?


Saturday, 24 August 2013

Someone else's stock, and a mouse with two tails

As my father-in-law continues to struggle with his loss of manual dexterity, I keep trying to come up with solutions to some of the things he finds difficult.  He now has an electrically operated reclining/lifting chair, which is great, but he pointed out that the control panel (fitted with a generously proportioned clip designed to fasten to I don't know what) moved about on his side table every time he tried to adjust the chair.  I had a particular problem in trying to do something about this - no stock, as I had travelled light to visit and hadn't known about this in advance.

However, my brother-in-law, who lives nearby, generously gave me the run of his workshop and with a couple of pieces of wood, four 22mm pipe clips and a keyhole saw I fashioned a practical but non-too-elegant addition to FIL's tray stand which keeps the control panel rigid.


Another issue that we've been aware of for some time is the problem of managing a computer mouse when your fingers won't do as they're told.  By the time the mouse has been moved to get the cursor into position, the effort involved in pressing the mouse buttons often shifts the whole thing, and therefore the cursor, away from its target.  Very frustrating!

So I wondered whether it would be possible to separate the button functions from the movement function.  I shied away from wireless/optical mice, and dug an old wired one from the depths of a drawer.  Dismantling it revealed far more circuity than I was expecting, but I managed to drill the case and insert a second four-core cable, soldering the wires to the microswitches operated by the left and right buttons (FIL never got the hang of the wheel, so I gratefully left that alone).  Then I made a simple timber console to fit in front of the computer display, and wired two normally open switches in parallel to offer an alternative to the mouse buttons.  The mouse can be operated as intended, but the black switches offer less restricted access to clicking left and right.  It works for me, and it's going to Devon next week for FIL to try it.  One small confession - the switches weren't stock items.  I did think of buying a dozen but somehow restricted myself to just the two!


Tuesday, 30 July 2013

Trekking in the Austrian Alps

When the invitation came some months ago to join a group of old friends on a trekking holiday to Austria, only one of the reasons for saying yes, but an important one, was the fact that I have all the gear.  The promise of sunshine, the lure of the mountains, the treat of having a couple of weeks off home duties - all these were important (and a big thank you is due to Liz and other family members for providing home cover), but I definitely have a sense that I should be using all the mountain-walking kit I have accumulated over the last 40 years.  After all, having all the equipment must make the trip into a cheap holiday?

I had some doubts about being fit enough, and managed too few practice outings.  I did get far enough one day to find my heavier walking boots rather uncomfortable, so opted to take a lighter pair.


This was not a particularly good decision, as in the event we crossed a lot of snowfields and the soles had little bite.  The flexing also left me with a sore foot halfway through trek which needed to be blasted with anti-inflammatories.

I had greater confidence in my trusty, 30-years-old karrimor rucksack.  It has seen good service, with me mainly in Scotland, with my children in Iceland, America and India.


 It still bears the badge of the Mountain Bothies Association, a great group which co-ordinates simple shelters in the British wild places which can be, or feel like, life-saving refuges at the end of a long day's walk.

Fully loaded, the rucksack weighed in at Manchester Airport at 16.5Kg, so the early days of our expedition as (I hoped) I built my fitness up were never going to be easy. You will realise by now that I was not going to win any prizes for being the best turned out trekker with the smartest kit.  Even my friends found it hard not to comment on my non-matching walking poles.


They have stories to tell.  The green one is the survivor of a tricky day/night in Fisherfield which ended in a plunging, tumbling crossing of a bad-tempered bog as we sought out Shenavall bothy - its mate bent under my weight in a half-fall and was irreparable.  The one on the left was a crafty Ebay purchase to make up a 'pair' - its wooden knob unscrews to reveal a camera mounting thread


which allows you to take great group photos like this:


This was our group in the Oetztal, on an excursion day from one of the many Alpine Club mountain huts we stayed and ate in.  We all managed the high paths, but not all of us bagged the peaks.  After all, someone has to take the spectacular photos:


We had a great time, and now the kit is back in the cupboard.  Both walking poles came back slightly bent after snowfield tumbles but straightened up nicely with a 15mm plumber's bending spring.  Maybe it shouldn't be too long before the kit is given another outing.


Sunday, 30 June 2013

New camera (2)

On our trip to the Outer Hebrides we were keen to try out the new camera's capacity to capture images of wildlife, as we have never previously been able to snap more than very close, very still subjects.  It must be emphasised that I, as the photographer, have a long way to go to catch up with the capabilities of the camera, and sadly birds in flight (particularly a hen harrier near our last campsite) proved quite beyond me.

However (and, as in the last post, the images are unedited) we were reasonably pleased with the outcome.
On North Uist, we saw hundreds of land- and water-based oyster catchers.


On Berneray arctic terns were settling on the cultivated crofts.


There were plenty of lapwings, too.


But the stars of the show on Berneray were probably the harbour seals:


On our campsite on the south coast of South Uist bees were active in the sunshine.


On our final walking day we explored an estuary on the east coast of South Uist and were very taken with these Aylesbury ducks:


The above shot was taken from the same spot as this next one, at the opposite end of the lens' range (you can just pick the ducks out, lower centre):


But the overall star of the show (photographically at least) had to be this red deer stag, antlers still in June velvet.  He seemed to want to say something to me ('Nice camera' ?)


Monday, 24 June 2013

New camera

Inspired by Wendy at Blue Borage, I recently bought a new camera.  If you could see my stock of cameras, you might think this unjustified.  I go back to 35mm and APS film systems, have a movement-triggered wildlife camera and a motorbike/windscreen cam, as well as a nice compact digital.  My Canon SLR 35mm film body went a while ago, but its lenses live on with a digital body picked up on Ebay. But the point is, even with an SLR reasonably long zoom lens, I have been missing out on distant telephoto targets.  So enter a superzoom bridge camera, a little smaller than an SLR with a standard lens, capable of bringer those distant objects really close.

Our long-planned week-long trip to the Outer Hebrides offered an opportunity to try it out.  I was interested to test some of its overall capability, but also interested to see what I could gather in the way of wildlife shots.  That last category I will leave for another blog.  Here's a short account of the trip in some other images.

I first crossed to Skye on the ferry from Kyle of Lochalsh about 50 years ago.  The 'new' bridge does seem a bit of a cheat, but it is very convenient, and photogenic with the Skye peaks in the background.


We drove across Skye, stopping off briefly at a couple of favourite places in Portree, and caught the afternoon ferry to Lochmaddy on North Uist from Uig on Skye's north-west coast.  This is the ferry coming in (I'm getting used to the telephoto capacity here.)


 While we were waiting to board, Liz asked me take a photograph of a church on a distant hillside.  With a small amount of telephoto, this is how it looked:


To show off the camera's capability, this is maximum telephoto:


From the deck of the ferry (with hardly any roll, it was very calm) here is a view back to the Cuillins:


The rest of the images show the camera's ability to reproduce colours faithfully.  I am being lazy and using the straightforward, built-in formatting.  It is possible to extract RAW data and do more editing - something for another day.

Here is a North Uist sunset at about 11pm (15 June, a week to go to the longest day):


Here is Trinity Temple on South Uist, where Duns Scotus studied:


Here are hand-dyed, hand-knitted and crocheted works of art at the Hebridean Woolshed:


And to end with, a couple of landscape shots.  The first a standard shot of an-anything-but-standard beach (3 miles of deserted heaven - just the two of us all afternoon):


The second, an appreciation of the islanders' sense of colour fun - a crofter's shed picked out from a distant road in the late afternoon:


This camera is, in my humble opinion, a great bit of kit.

Monday, 3 June 2013

Motorcycling

I first had motorised two-wheels when in the Sixth Form.  A holiday job in a cotton mill (yes, there used to be thousands in south-east Lancashire where I grew up) produced the £40 necessary to buy an ancient Lambretta 150cc which gave me lots of fun and problems until I sold it as I went to university.

When I graduated I bought my first car, a mini traveller (848cc) and over the years family responsibilities meant that 4 wheels were always the order of the day.  Then, in the 1990s, with increasingly independent children and a wife who was working a good motorway drive/ride away from home, I took the plunge and bought a second-hand BMW K100LT (998cc) - a touring bike capable of comfortable long distance rides.  I still had my full licence so I was soon back in the groove.

In the mid 00s this bike was stolen from outside the ground where I was watching older son play semi-professional rugby league.  I got a fair insurance payout and bought a BMW R1100RT (1098cc) like this one:


Since our move to N Wales, I have used the bike occasionally for the work run, and had a few adventures (Scotland twice, London for a concert, Cambridge for a funeral) to keep the engine ticking over.  It doesn't get a great deal of use in the winter, particularly not the kind of wet and snowy winter we have just emerged from.

As part of the motorcycling spring-clean this year, I decided to sign up for a safety workshop run by N Wales Police (www.bikesafe.co.uk).  This is a one-day course, with the morning spent in the classroom looking at accidents and how they can be avoided, followed by a one to one 3-hour ride-out with a highly qualified observer (most are serving or ex- police motorcyclists) who provides feedback and advice about your riding style and competence, with particular reference to safety.  As the ride-out was on bendy roads I didn't know, taking us to Betws-y-Coed and back, it was quite challenging.  The level of concentration needed was very high, reminding me that trying to stay safe on the roads should always mean thinking of nothing else while riding/driving.

I was signed off with a certificate assessing me as a low/medium risk rider (there's one category safer, two less safe).  Further training with the Instititute of Advanced Motorists or a similar organisation is an option.  Frequent use of the bike undoubtedly helps, too.  Thankfully the training day brought a change to the weather, and we've had sunny days since.  Long may it last.

Friday, 3 May 2013

A second Kindle stand

My father-in-law has found the first Kindle stand (previous post) helpful, but has been struggling to operate the power switch, a tiny affair at the base of the reader which usually needs a well-controlled, small finger-end to operate it.

So the second prototype includes a big button which, through a sprung plunger, operates the switch with a steel rod.


It's an even more pleasing use of stock items than version 1.  Again, it uses offcuts of 13mm MDF, but now with added delights: part of an old broom handle (the knob), a screw (the steel rod), a ballpoint pen spring, and a piece of a brass hinge (the plate which retains the spring).  Oh, and a bit of glue.

It's going to be taken to Devon to be trialled next weekend.  Fingers crossed.

Tuesday, 23 April 2013

More baskets, and a Kindle stand

My younger daughter and I had planned to share a basket-weaving session on her last visit, so I put some willow to soak in our outside bath.  Unfortunately, she arrived during the cold snap and the willow was frozen into a gigantic block of ice, so no progress was possible.  She wanted a display basket, so I set about something smaller than my previous log-bearing efforts.  This is what arrived:


Actually, she wanted two (the point of the original idea for joint making) so with a few calculations and a lot of guesswork I set about making one slightly bigger so that they can be stored together:


By no means perfect, but adequate.  That's almost the end of the brightly coloured willow from Devon, and almost the end of this year's total crop, so it's time for a break from basket-making.

We continue to try to help father-in-law deal with his increasing difficulties in manipulating things.  Unable now to hold a book and turn the pages, a Kindle has been a great acquisition for him and he reads avidly.  Lately the issue of holding the Kindle while fiddling with its controls has become a problem, so I thought I would have a go at making a stand for it which will allow easy access to its edges and therefore its buttons.  This is to be regarded very much as a prototype.  I'm posting it to him this morning and look forward to his feedback.


Friday, 22 March 2013

Some things take a little while

I have a very long list of jobs, and a lot of stock items associated with them. I don't fully understand the process by which things get put off for another time - something to do with the difference between the important and the urgent?  When I acquire materials I almost always intend to process them reasonably quickly, but that often doesn't follow.  My record, I think, is a package in the workshop which contains the pieces of teak and slate needed to make a small coffee table, which is wrapped in newspaper dated 1975.  I should be able to sort it by the end of 2015, I think.

So my third willow basket has happened at lightning speed.  In January my younger son and his wife donated  a red wig for my car:


This was some overgrown willow from their Devon garden.  I don't know a great deal about all the various willows, but this had the advantage of beautiful colour variations from yellow to red, and the disadvantage of being rather thick-stemmed with lots of side shoots. When I got it home I spent ages trimming off the sideshoots, and used the thickest rods to create a screen for some of our compost bins.  The rest went in the bath to increase its pliability (not our only bath, in case you were wondering):


As I worked with it, I learned a lot about which rods were really too thick for the job in hand, so the outcome was a rough-and-ready (artisanal?) basket which has now gone back to Devon to hold logs for the willow-providers.  They are kind enough to say it's fine.  As it's the first basket I've made without expert supervision, I'm grateful to them, but shall be aiming higher next time.


Tuesday, 5 March 2013

Wisteria support

We have been planning for a while to plant a wisteria in the side garden.  To support it (assuming that it grows!) we designed an open structure which in effect creates a new south 'wall' facing the utility building.  In due course the drystone wall will be repaired (Elizabeth is going on a National Trust course this summer) so I used up some 4 x1 carcassing and some half-round posts, held together with galvanised roofing bolts.  The new planting is going to feel somewhat intimidated for the first few years, we feel.


Sunday, 24 February 2013

Kitchen chairs - new life

We're not sure quite how the upholstered seats on our kitchen chairs had become so disgusting.  It's not as if we make a practice of sitting in muddy pools outside in preparation for using them, but Liz pointed out yesterday that it did look as if we had.  So off she went to Abakhan at Greenfield and back she came with some lovely large check material.

This afternoon the job snuck in front of the hundreds actually on the list and we shared the removing of hundreds of staples, the cutting of the material and the re-stapling.  There are eight chairs, so it did take a while. It also uses a lot of staples, but fortunately I received some recently (along with many upholstery tools - thanks, Graham) as part of father-in-law's stock clearance. Maybe we should now use the kind of covers the garage puts on the car seats at service time?


Wednesday, 20 February 2013

Bath installation

Well, this was the easiest bit of 'plumbing' I've ever done.  Ever since I brought my crop of willow from Devon, I've been wondering whether I could use our fish pond to soak it.  This seemed a bit harsh on our fish, so I advertised on Flintshire Freegle for a bath.  The system is great, and the following day I was able to help a chap in Abergele get rid of part of his rubbish after a bathroom refit.

This afternoon, in an icy wind, I popped the bath onto a couple of building blocks alongside the barn and out of sight behind an IBC, handily placed to fill it.  So in went the stored rainwater, and the willow, and in a few days time I'll be hoping to start my next basket.